This month I am pleased to welcome Jessica from Creations by Lady Zig for our craft fair display example! I was drawn to the creativity that she had to deploy when having a craft table in a super small space. If you’ve ever had to do this, it requires a bit of ingenuity.
Creations by Lady Zig makes all kinds of adorable Crochet items as well as Crochet patterns. I’ve long admired her cute chicken earrings, taco earrings, and mushroom earrings that look like something out of a Super Mario Brothers game. Since she is newer to selling, she has great perspective from someone in an early stage business.
She has also authentically shared how her first display looked, as well as how it has evolved, which is incredibly encouraging. We all start somewhere, and this is a lovely evolution to watch.
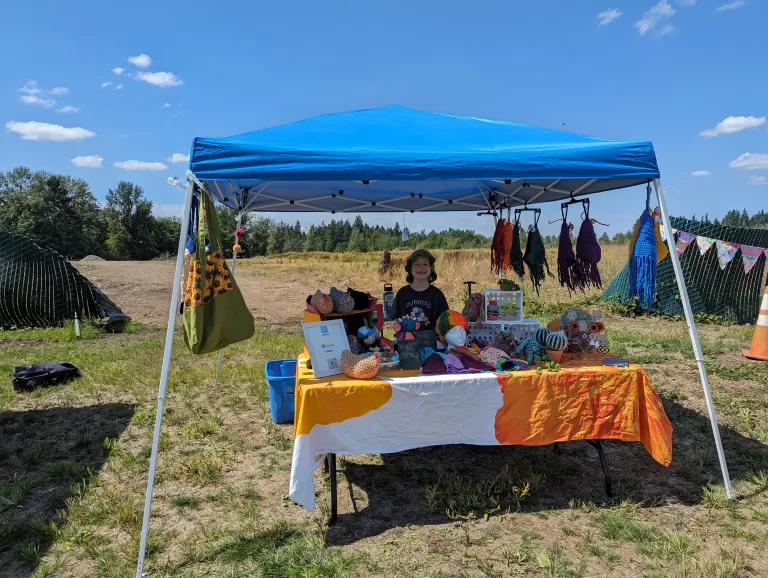
Tell us the story behind how you designed this craft fair display?
I designed this display based on a few factors: 1. It needs to be mobile and I will need to be able to set up and take down by myself. 2. I have a very tiny budget. 3. It needs to draw customers in.
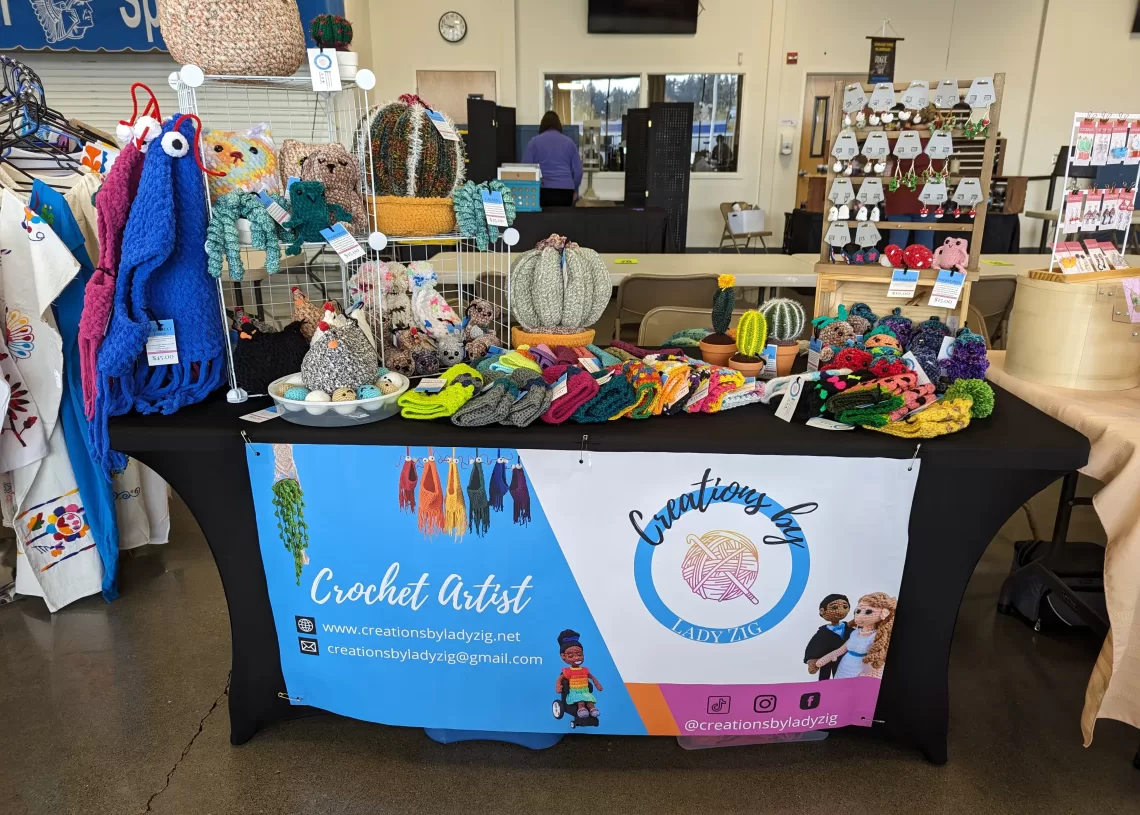
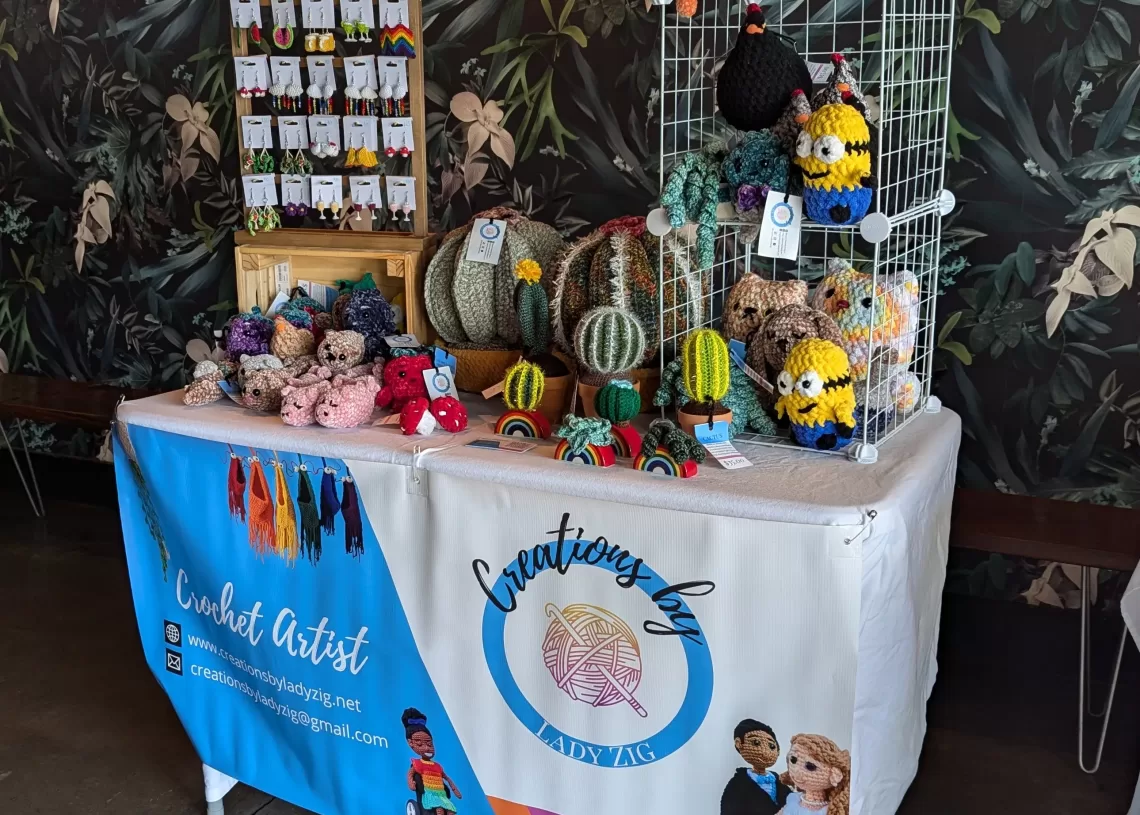
For mobility, I normally use a 6 foot folding table that also folds in half. This makes transporting it in my car way easier. I use a wire mesh cube storage set. It can easily be put together and taken apart which also helps with space in my vehicle. For my large table I use one of those stretchy folding table tablecloths. They are great and look nice when they are on. It’s also wrinkle resistant so I don’t have to worry about pressing anything and storing it without getting creased. I can set up and take down my display in less than 30 minutes by myself. This allows me to now stress out on market days. For my earrings, they live on an earring display all the time. I wrap it in bubble wrap and transport them already on the display. It saves time during setup and tear down.
For budgetary reasons, my display is slowly evolving over time. My first market, I used a lot of things I had already around the house that could be repurposed. I had a wooden crate that looked cute with the chickens. I used a tablecloth that I already had and still looked nice. As I have made some money I have reinvested some into a new canopy tent for outdoor markets and then added the cube storage. Occasionally, I would find something at the dollar store that I could use, like a deviled egg tray for my chickens and eggs.
To draw people in, I did invest in a vinyl sign that I had made. If I were to do it again I would probably do one of the table runners with my logo on it. Hanging the sign on in front of the table is good but it doesn’t work as easily as a fabric table runner. Height is a great way to add more display area as well as catch people’s eyes. The cube storage works well for that and I set my earring tree up on the wooden crate to get them more at eye level. The small items that are intended for children are on the lowest level so the kiddos can see them.
How did you adapt your design to fit the type of event you were attending?
For this event, we were only allowed a 2 x 3 foot table space. I have a smaller table that I could use but it was definitely a challenge to decide what to put out and what to leave off the table. I went with building only 2 cubes instead of 4 or 5 that I use on my larger set up. I have some hats that I normally put out but due to this market being in June, I thought they could be left in the box. No one is thinking about winter cozy hats in June when it is 80 degrees. Leaving those out made room for the items that have been selling well at markets so far.
I had to come up with a different table cloth solution as well. My normal stretchy one won’t work on this small of a table. I used a white one that I have and was able to tie it to the table legs to keep it neat.
What kinds of materials did you use to create this display?
I used a modular cube storage system, a folding table, tablecloth, and a wooden crate. My earrings are on an earring display that I purchased once I started making them. It helps to keep them organized and easily accessible to customers. A vinyl sign with examples of my work on them.
Please share your favorite 3 tips/secrets to designing a craft fair display
My main tip would be to keep it simple. An elaborate display may look great but you need to take the time you spend setting up and tearing down into account. If you cram too much product on our table/display it may be overwhelming to your customer and they might pass you by.
Secondly, get a little cart/wagon that folds up. It has been a joy to use to get my product and set up into spaces without carrying everything.
In this article you see a few different iterations of my display including the very first one. You can see how things have changed in just a year!
Want to learn more about Lady Zig's products?
Thank you so much to Creations by Lady Zig for sharing a great craft fair display example! Learn more about her products through the links below!
Want more craft fair display examples?
If you are looking for more ideas- check out our downloadable with multiple craft fair display examples!
Interested in a subscription to the magazine?
Interested in a digital or print subscription to our quarterly magazine? Or are you interested in reading back issues of the magazine?
